Goat Cheese Cheesecake with Pistachio Crust and Poached Fruit
Classic cheesecake with a subtle tang from creamy goat cheese is topped with figs and apricots poached in honey syrup and accented with warm spices for a spectacular dessert.
- Total Time: 1 1/2 hours (+ 10 hours standing time)
- Yield: 10 Servings 1x
Ingredients
Crust
- 1/3 cup (75 mL) Gay Lea butter solids unsalted
- 2 cups (500 mL) graham crackers, crumbs
- 3/4 cup (175 mL) pistachios, shelled and roasted
- 1/2 cup (125 mL) granulated sugar
- 1/2 tsp (2 mL) salt
Cheesecake Filling
- 8 oz (250 g) Hewitt’s goat cheese log
- 1 cup (250 mL) Gay Lea sour cream 18% thick
- 1 lb (500 g) cream cheese, brick-style and plain
- 3/4 cup (175 mL) granulated sugar
- 3 eggs
- 2 tsp (10 mL) vanilla extract
Poached Fruit
- 1/2 cup (125 mL) honey
- 1/4 cup (60 mL) lemon juice
- 1 vanilla bean, split and scraped
- 6 peppercorns
- 4 pods cardamom, green
- 4 allspice berries
- 4 cloves
- 1 star anise
- 2 orange zest strips
- 2 lemon zest strips
- 12 figs, quartered
- 6 apricots, chopped
- 1/2 cup (125 mL) pomegranate seeds
Instructions
Crust
- In food processor, pulse cracker crumbs and pistachios until well combined and uniform in size; add sugar and salt. Drizzle butter over top; pulse until evenly coated.
- Center 9-inch (2 L) springform pan on large square of foil; press foil up side of pan. Firmly press crumb mixture evenly into bottom of pan. Bake in 350°F (180°C) oven for 12 to 15 minutes or until golden around edges. Let cool completely.
Cheesecake Filling
- Using electric mixer, beat together cream cheese, goat cheese and sugar until well combined. Beat in eggs, one at a time, just until incorporated. Fold in sour cream and vanilla. Spoon over crust and smooth top.
- Place cheesecake in deep hotel pan; fill pan with enough boiling water to come halfway up side of springform pan. Bake in 325°F (160°C) oven for 60 to 75 minutes or until set around edges but still slightly jiggly in center. Set hotel pan on rack.
- Run thin knife around cheesecake. Let cool in water bath for 1 hour. Remove from water and let cool completely. Refrigerate for at least 12 hours or up to 3 days.
Poached Fruit
- In saucepan, combine 1 cup (250 mL) water, honey, lemon juice, vanilla seeds, peppercorns, cardamom pods, allspice berries, cloves, star anise, orange zest and lemon zest. Bring to boil; reduce heat and simmer for 5 minutes. Cover and remove from heat. Let stand for 5 minutes. Strain and discard solids.
- Add figs and apricots to saucepan, ensuring they are covered with syrup. Poach for 15 to 20 minutes or until fruit is tender and liquid is thickened. Stir in pomegranate seeds; poach for 3 minutes. Remove from heat and let cool completely.
Per Serving
- Place 1 piece of cheesecake on dessert plate. Top with 1/3 cup (75 mL) poached fruit and syrup.
- The cheesecake in this recipe can be garnished like any other cheesecake or with toppings that would complement goat cheese, such as cranberry coulis, poached pears or chocolate ganache.
Notes

Cranberry Scones
Enjoy these versatile scones at breakfast or brunch, or with your afternoon tea.
- Total Time: 35
- Yield: 6 Servings 1x
Ingredients
- 1 cup (250 mL) Hewitt’s homogenized milk
- 1 tbsp (15 mL) lemon juice
- 2 1/4 cup (550 mL) all purpose flour
- 2 1/2 tsp (12 mL) baking powder
- 1/2 tsp (2 mL) baking soda
- 1/2 tsp (2 mL) salt
- 1/2 cup (125 mL) Gay Lea salted butter
- 1/2 cup (125 mL) dried cranberries
Instructions
- Add lemon juice to milk and let stand 15 minutes.
- Combine flour, baking powder, baking soda and salt. Add butter and cut into flour with pastry blender until texture of coarse meal. Stir in dried cranberries. Stir in milk to moisten dry ingredients.
- Roll out on floured surface to 2″ (1 cm) thickness. Cut into 2″ (5 cm) rounds or squares. Sprinkle with granulated sugar. Bake at 425ºF (220ºC).
Notes
Cinnamon Apple Strata
A family favourite for dessert or brunch.
- Total Time: 75
- Yield: 8 Servings 1x
Ingredients
- 2 apples, peeled, cored and diced
- 1 tbsp (15 mL) Gay Lea salted butter
- 1/2 tsp (2 mL) cinnamon
- 8 slices raisin bread, diced small
- 3/4 cup (175 mL) Ivanhoe extra old white cheddar, grated
- 2/3 tbsp (30 mL) brown sugar
- 2 cups (500 mL) Hewitt’s homogenized milk
- 3 eggs, large
Instructions
- Preheat oven to 350°F (180°C).
- In a non-stick frying pan over medium heat, sauté cinnamon and apple together in butter until tender.
- Place 3/4 of bread into lightly buttered 8”x 8” (20 x 20 cm) baking dish. Spread apple mixture, cheese and brown sugar evenly over bread.
- Beat milk and eggs together until frothy and stir in remaining bread.
- Add to baking dish to baking dish and bake 45 to 60 minutes until set. Great chilled.
Simple Weeknight Dessert: Apples sautéed in a little butter and sprinkled with cinnamon make a scrumptious dessert. Make extra and enjoy with a chunk of old cheddar for a super snack.
Notes
Baby Cakes with Lemon Buttercream Icing
Larger than a cupcake, but more fun and fancy to share than a slice of cake, baby cakes are a fabulous dessert. These cakes are perfect for special occasions.
- Prep Time: 35
- Cook Time: 25
- Total Time: 1 hour
- Yield: 6 Servings 1x
Ingredients
- 2 eggs, separated
- 1 1/3 cups (425 mL) Gay Lea Salted Butter, room temperature
- 1 cup (250 mL) granulated sugar
- 1 tsp (5 mL) lemon zest, grated
- 1 1/2 cups (375 mL) all purpose flour
- 2 tsp (10 mL) baking powder
- 1/2 tsp (2 mL) salt
- 1/2 cup (125 mL) Hewitt’s Homogenized Milk
- 3 cups (750 mL) icing sugar, sifted
- 6 lemon curls, see cooking tip
- 6 mint leaves, to garnish
Instructions
- Preheat oven to 350°F (180°C).
- Butter 6-cup jumbo non-stick muffin pan (each 3 1/2”/9 cm diameter and 3/4 cup/175 mL capacity). In medium bowl, beat egg whites until fluffy and holding soft peaks. In large bowl using an electric mixer, cream 1 cup (250 mL) each of butter and sugar until fluffy and light yellow; add egg yolks and lemon zest; beat 1 minute.
- In small bowl, combine flour, baking powder and salt. On low speed, mix in half of flour mixture with butter mixture, just until blended. Blend in half of milk. Repeat with remaining flour mixture and then milk, beating after each addition until blended. Gently fold reserved egg whites intobatter. Evenly divide batter into prepared muffin pan. Place in centre of oven and bake 25 minutes or until baby cakes are browned and a toothpick inserted into the middle of the cake comes out clean. Let cool in pan for 10 minutes. Transfer to rack to cool completely.
Lemon Buttercream Icing
- Using electric mixer, beat remaining 3/4 cup (175 mL) butter until light and fluffy. Beat in 1 cup (250 mL) icing sugar, until well blended; about 1 minute. Add 3 tbsp (45 mL) freshly squeezed lemon juice, then remaining icing sugar, 1 cup (250 mL) at a time, beating well after each addition. Cut each cooled baby cake in half crosswise. Spread 2 tbsp (30 mL) of icing over bottom layers and top with cake tops, pressing lightly. Decorate baby cakes with icing. Garnish with lemon curls and fresh mint.
TIP: Use vegetable peeler or citrus zester to remove long thin strips of peel from around the lemon. Cut to desired length and roll strip into curl.
TIP: If icing becomes stiff, place hot cloth around bottom of bowl and stir, or add 1 tbsp (15 mL) milk or cream at a time to desired consistency.
Notes
Taking customers back to a simpler time through bites on your menu can bring very up-to-date new dollars to your bottom line. Whether it is fallout from dealing with COVID for way too long, or Canadians generally longing for the times in our lives that felt easier and safer, a quick trip down memory lane is, increasingly, through our tastebuds. But rest assured, you don’t need to completely revamp your menu to add some retro flavour.
For some, it just takes a phrase – cruising the strip on Friday night. For others, just a word – fondue. A few music notes might be all it takes. Or it might even just be an ingredient – maraschino cherries. All evoke memories of simpler, less COVID times.
Give your customers a moment in time, their time. The demographic of your guests will determine which decade or decades your menu (and bar) additions could play in.
Add a little retro to your restaurant menu
When it comes to food, retro is not necessarily about the flavour or taste. Retro is about the feeling that menu item or ingredient or style of presentation evokes.
No need to fully commit. It doesn’t have to be the whole menu or even an entire meal.
Sprinkle some memories all over the menu – a devilled egg here, a jellied salad there, Tequila Sunrise at the bar, Black Forest Cake for dessert. It doesn’t take much to add retro chic to the vibe.
Sprinkle some memories all over the menu – a devilled egg here, a jellied salad there, Tequila Sunrise at the bar, Black Forest Cake for dessert. It doesn’t take much to add retro chic to the vibe.
If you can’t decide or have a smorgasbord of ideas you want to try out, retro options lend perfectly to LTOs. They are time offers, after all. So, take a spin through the decades until something clicks – with you and your diners.
“Make mine retro” is an approach that might appeal to guests who love customizing their meals. They still get to order their favourite dishes from your menu but can give them a retro spin with a selection of add-ons – devilled eggs, scalloped potatoes, layered jelly, vegetable croquette.
Share the memories
Sharables bring people together. Adding some menu items that start conversations about the good ole days will fill your customers’ cravings for delicious comradery.
Retro night – change the music, adjust the lighting, make a few menu additions and you are ready to go. Pick a decade and jump all in or cycle through the decades each week.
Involve your guests – costume contest, trivia, vote for favourites (song/music artist, movie, tv show, fashion). Everyone is yearning for events, involvement and new experiences.
Take the 1950s, a very evocative decade. Change your music selection to Elvis, Frankie, Dean, maybe even a little Johnny Cash. Brighten the lighting and give your waitstaff a bandana (hair, neck or back pocket).
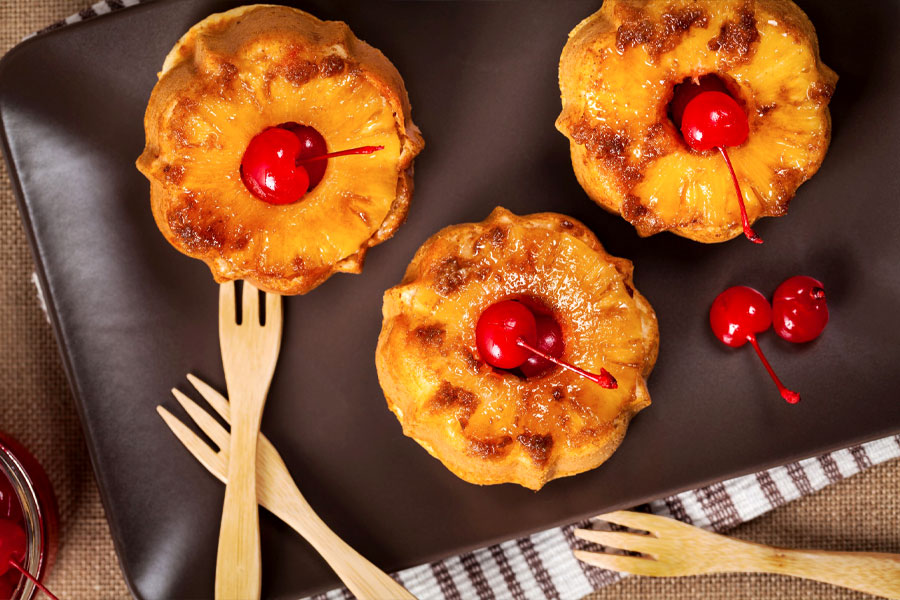
1950’s Menu Ideas
- Cocktail Hour – Manhattans and Sidecars, Stuffed Celery and Shrimp Cocktail
- Salad – Jellied Salad and Three Bean Salad
- Main – Chicken a la King in Puff Pastry
- Dessert – Chiffon Cake or Pineapple Upside Down Cake
How about shareable options? Platters or even retro flights. Pick a decade or offer a selection of items spanning decades. A retro flight could be used to travel the decades one bite at a time – bar selections, appetizers and desserts are a great fit for a trip back in time.
Try retro-fitted upgrades in your restaurant menu
Bringing a recipe back from the past to meet current trends while pleasing the nostalgic palate is a smart approach.
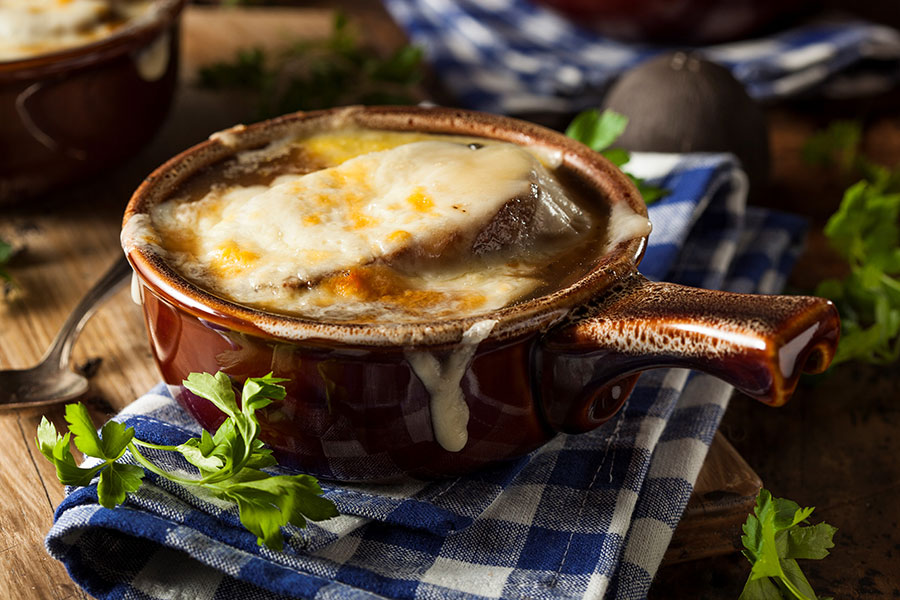
Do you remember hoping your mom would order French onion soup when you were a kid? That drool-worthy soup would arrive at the table, with broiled cheese melting generously over the side of the ovenproof crock. Remember impatiently waiting for it to cool enough to get that first extra cheesy bite, even suffering through a piece of onion?
You likely aren’t the only person with fond memories of this starter.
Sure, you can keep it classic, if that suits your brand. But consider giving it an upgrade to make it yours – stand out from the crowd. It doesn’t take much.
How to adapt your restaurant menu:
| Current Trends | How to Adapt |
|---|---|
| Vegetarian | Swap beef broth with vegetable broth, swap traditional gruyere with a smoked cheddar for a deeper flavour profile |
| Plant-Based | Swap out beef broth, use a plant-based fat to caramelize onions, add mushrooms to increase the umami flavours |
| Gluten-Free | Swap out bread for gluten-free options – bread or buns, first toasted before adding to the soup will keep their shape |
| Dairy-Free | Swap out cheese for non-dairy cheese product that has good melting properties |
| Healthy | Cut the amount of fat used to caramelize the onions, add more vegetables, shredded carrots, and cabbage, even some crushed tomatoes; slice bread thinner and use shredded cheese to get more spread, using less product |
| Customizable | Offer customers a choice of cheese (old cheddar, gouda, swiss, gruyere or a blend), serving size, extra onions, double the croûte |
| Local | All the ingredients for this simple yet rich soup are available in Canada |
| Simplified Prep | Heat ready-to-use onion soup, toast bread slices, top with pre-shredded cheese broil and it’s ready |
Whether you call it retro or nostalgic, it all comes down to comfort and remembering a time when things felt happy and right… When we were all younger and lives seemed simpler, easier and safer. All it takes is one bite to bring back the flavour, fun and fondness. It might be so popular that old school becomes new school.